Cartoon face drawing isn’t rocket science but perhaps you (like Tammy down below) would like to know the principles behind drawing rounded, realistic, 3-D ones?
Tammy thwacks her pencil down onto her notebook in frustration.
Despite copious amounts of erasing and tweaking, her cartoon face drawings are looking … yucky.
Insipid.
Un-interesting.
And worst of all — flat.
Isn’t there a simple way to get them looking rounded and realistic?
What if she could crack the secret 3-D cartoon face drawing code once and for all?
Cartoon Face Drawing — step by step
This back-of-a-napkin lesson will take you through
- creating basic face proportions using quarters and crosshairs
- using the Equator and Longitude line method to create depth
- turning the face to left and right
- tilting the face up and down
Basic face-on proportions
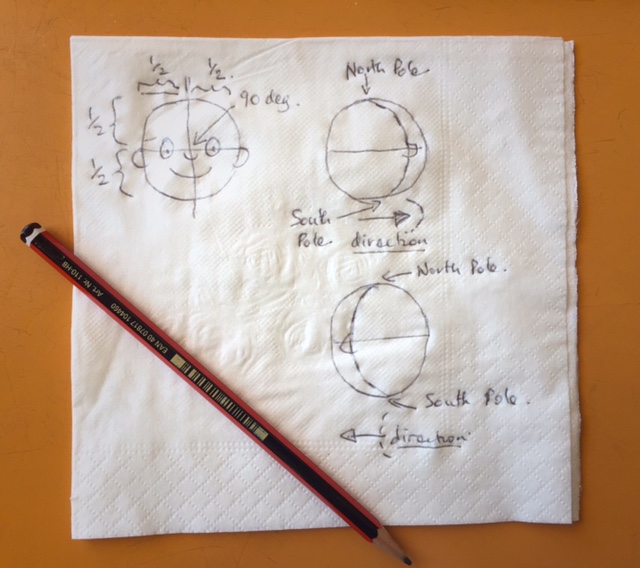
The first image on this napkin shows you how to use crosshairs for cartoon face drawing. Although we don’t consciously notice this (mostly due to part of the face being concealed by hair), a person’s eyes are situated halfway between the crown of their head and the tip of their chin.
Similarly, an imaginary line drawing vertically through the nose divides the face in half from top to bottom.
By drawing a circle and using a horizontal and a vertical line to ‘quarter’ it symmetrically, we create a template that helps us to position all the basic features of the face and head accurately in relation to one another.
- The eyes sit on the half-way line.
- The nose sits at the point where the two lines cross.
- The top of the ears sit about level with the eye pupils.
- The mouth is ‘a certain distance’ below the nose.

You can draw basic straight-on face proportions using crosshairs and quarters to position the eyes, nose and ears. When you want to turn the face right or left, imagine the eyeline as the Equator and the nose line as a line of longitude. The further the line of longitude approaches to the outside of the ‘globe’ the more the face is turned in either direction.
Using the Equator and Longitude Method to Create Depth
The two images on the right up above show how to move from drawing cartoon faces face-on and flat tNorth owards creating realistic 3-D faces.
Time for a quick geography refresher 🙂
Remember the Equator, an imaginary line that divides the earth horizontally North from South? That’s the eyeline for our purposes.
Remember the lines of longitude that pass through both the North and the South Poles, and indicate whether you are east or west of the date line? Those are the nose lines for our purposes.
Once again, the eyes sit on the Equator (eyeline) and the nose position is where the two lines cross.
How to Turning the Face Left or Right in Perspective
Time to put the horizontal and vertical lines to work!
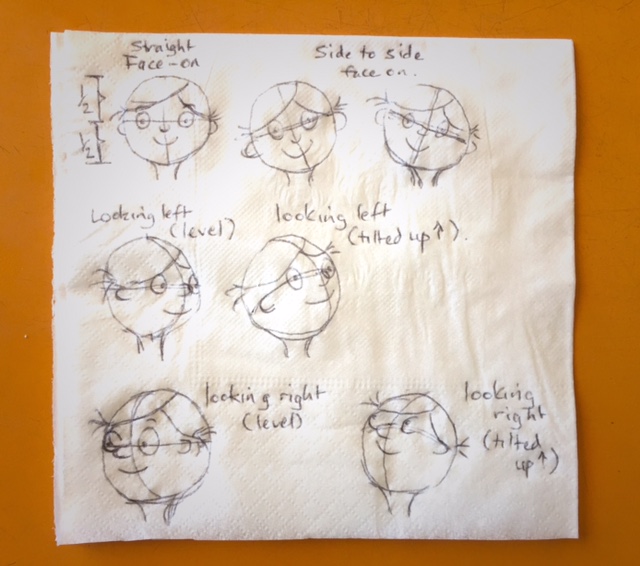
Keeping the Equator horizontal, if you draw a longitude line curving to the right, it indicates that the face is looking to the right (and the nose will be pointing to the right)
Conversely, if your longitude line is curving left, it indicates that the face is looking to the left (and the nose will be posting left).
The closer your longitude line comes to the outside of the circle, the further your face turns in either direction. Similarly, the closer your longitude line is to the centre of the circle, the less your face turns away from the face-on view.
Tilting the Face Up and Down in Perspective

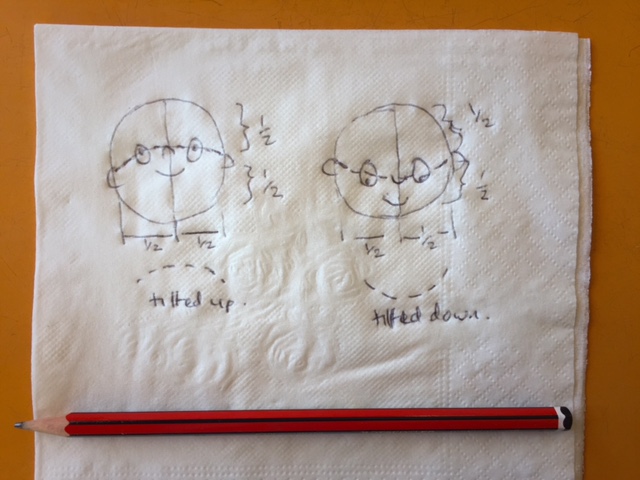
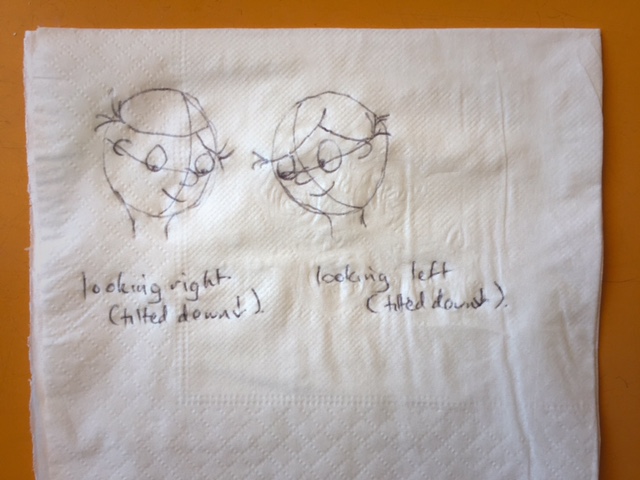
Tilting the face up and down involves curving the Equator line. A downward curve indicates the head is tilted forward while an upward curve indicates the head is tilted backward.
Some specific character examples
Time to put these principles into cartoon face drawing practice, with a very simple character that has a hairstyle rather than being an Old Baldy 🙂
Note that adding the neck helps ensure your character tilts its head beyond the bounds of physical possibility ?.


Video lesson: Drawing Cartoon Faces
Questions? Suggestions?
If you’re not 100% clear about drawing cartoon faces (or you have a question about something totally unrelated to this video), I’d love to hear from you.
Leave a comment and who knows? Your question could spark off an exciting new lesson series!
